Pebble WatchApp の設定をスマホから変更可能にする
このページは Pebble SDK 2.0 Tutorial #9: App Configuration | try { work(); } finally { code(); } の記事をおおまかに翻訳したものである。(Chris氏から許可いただきました)
Pebble アプリにはWatchface と WatchAppの2種類があり、WatchfaceはPebbleのハードウェアボタンを使用することができないのでPebble上で設定を変更することができない。
このため、Android/iOS 側で設定ページを用意する必要がある。
ここでは例として、Watchface や WatchApp の背景色をPebbleKit JSを使ってスマホ側で変更できるようにしてみる。
参考ページ Developer Guides // Pebble Developers
作業の流れ
- PebbleKit JS からデータを送れるように WatchAppでAppMessageを使えるようにする
- appinfo.json か、CloudPebble の設定ページで、AppMessageで使うKeyを設定する
- PebbleKit JS のコードを変更して設定ページをロードして watchappに送るようにする
- HTMLページを用意してユーザが設定を変更できるようにする
PebbleKit JS からデータを送るために WatchAppにAppMessage用コードを追加する
AppMessageInboxReceived ハンドラを用意し、メッセージを受けられるようにする。
ハンドラ中で persist date に値を書き込む。
static void in_recv_handler(DictionaryIterator *iterator, void *context)
{
  //Get Tuple
  Tuple *t = dict_read_first(iterator);
  if(t)
  {
    switch(t->key)
    {
    case KEY_INVERT:
      //It's the KEY_INVERT key
      if(strcmp(t->value->cstring, "on") == 0)
      {
        //Set and save as inverted
        text_layer_set_text_color(text_layer, GColorWhite);
        text_layer_set_background_color(text_layer, GColorBlack);
        text_layer_set_text(text_layer, "Inverted!");

        persist_write_bool(KEY_INVERT, true);
      }
      else if(strcmp(t->value->cstring, "off") == 0)
      {
        //Set and save as not inverted
        text_layer_set_text_color(text_layer, GColorBlack);
        text_layer_set_background_color(text_layer, GColorWhite);
        text_layer_set_text(text_layer, "Not inverted!");

        persist_write_bool(KEY_INVERT, false);
      }
      break;
    }
  }
}
下記を init などで実行する。
- app_message_register_inbox_received((AppMessageInboxReceived) in_recv_handler);
- app_message_open(app_message_inbox_size_maximum(), app_message_outbox_size_maximum());
書き込んだ persist data はwindow_load などで読み込む
appinfo.json に appkeys を追加する
App Metadata (SDK only) // Pebble Developers を参考に appinfo.json に appKeys を追加する。
今回の場合は KEY_INVERT を追加する。
{
  "uuid": "153ff30e-0288-4411-871c-fce3dcc99e5f",
  "shortName": "sdktut9",
  "longName": "sdktut9",
  "capabilities": [ "configurable" ],
  "companyName": "Chris Lewis",
  "versionCode": 1,
  "versionLabel": "1.0.0",
  "watchapp": {
    "watchface": false
  },
  "appKeys": {
    "KEY_INVERT": 0
  },
  "resources": {
    "media": []
  }
}
PebbleKit JS から設定ページをロードして watchappに送る
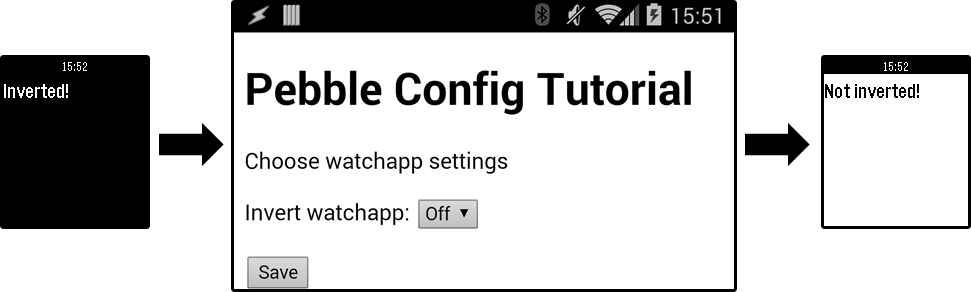
PebbleKit JS は、スマートフォンから configuration page を読み込んでwatchappに結果を送るためのもので、src/js/pebble-js-app.js にある。 “showConfiguration” と “webviewclosed” のイベントで設定を行う。 デフォルトの状態
Pebble.addEventListener("ready",
  function(e) {
    console.log("PebbleKit JS ready!");
  }
);
showConfiguration イベントでは、ページを開く
Pebble.addEventListener("showConfiguration",
  function(e) {
    //Load the remote config page
    Pebble.openURL("https://dl.dropboxusercontent.com/u/10824180/pebble%20config%20pages/sdktut9-config.html");
  }

);
webviewclosed では、設定を読み込む
Pebble.addEventListener("webviewclosed",
  function(e) {
    //Get JSON dictionary
    var configuration = JSON.parse(decodeURIComponent(e.response));
    console.log("Configuration window returned: " + JSON.stringify(configuration));

    //Send to Pebble, persist there
    Pebble.sendAppMessage(
      {"KEY_INVERT": configuration.invert},
      function(e) {
        console.log("Sending settings data...");
      },
      function(e) {
        console.log("Settings feedback failed!");
      }
    );
  }
);
SDKTut9 Configuration
Pebble Config Tutorial
Choose watchapp settings
Invert watchapp:
また、こちらのスクリプトも追加する。
関連記事
-
-
m5stack + MH-Z19B で CO2 濃度を測ってみた
テレワーク期間が長く続いているが、冷房をかけて閉め切った部屋にこもっていると、どうも頭が働
-

-
MacBook用外付けバッテリー HyperJuice vs PowerGorilla 2011/07/24
機内などでMacBookを長時間使いたいと思い、有名と思われるHyperJuiceを買おうとしたとこ
-
-
Pebble Update Server Error 問題
Pebble TimeとiPhone 6 plus がBluetooth接続できなくなり、ペアリング
-
-
Pebble E-Paper Watch のお届け先住所入力ページが用意された
4月にKickstarterで出資した、Pebble E-Paper Watch を作ってい
-
-
iPad用ペン AluPen を買ってみた。
年末に注文したAluPenをようやく入手。品薄で1ヶ月かかってしまった。Amazonで2404円。紹
-
-
エルゴノミクスマウス WOWPEN JOY 400-MA011 使用レポート1日目
腱鞘炎になったのでマウスをこれに替えた人が会社にいたので、数日悩んだ末注文。3480円
-
-
Kindle 3G + Wi-Fi Graphite 注文
最近通勤中などにO'reilly本やPDF本をiPhoneで読んでいるが、さすがにiPhoneだと
-
-
Eye-Fi Share 2GB を EOS Kiss X2 で使う
ブログに写真を載せる際には EOS Kiss X2を使っているが、USBで接続してiPhotoで
-
-
Dell 27インチ IPS液晶ディスプレイ UltraSharp U2711 その3 感想
2月11日に注文し、3月17日に届いたDell U2711 だが、毎日激しく活用している。結論として
-

-
[買ってみた] 新しいAirPods
2019年3月20日に突如発表された、新しい AirPods を買ってみた。 新型「